Conveyor Belt Lacing Procedure
1. Adhesive tape bonding: Apply covering glue; Lower covering glue; Adhesive tape layer; Bonding surface
(1) Butt joint: make the corresponding core layer (adhesive tape layer) at both ends of the tape joint on the same step and connect with each other. As shown in Figure 1a.
(2) Lapping: it is to make the corresponding core layers at both ends of the tape joint connect with each other on the next step, as shown in Fig. 1b.
2. Generally, the vulcanized joint of canvas tape often adopts butt joint. Because this joint form can fully meet the use of strong and low adhesive tape. And the bonding is simple and convenient. Lap joint is used for vulcanized joint of adhesive tape to remove strength, such as nylon cloth core tape, etc.
(1) Right angle (or right angle). The cut is at right angles to the center line of the tape, as shown in Figure 2 (a)
(2) Oblique angle or oblique mouth, and the section cut forms an oblique angle with the center line of the tape, as shown in Figure 2 (b)
(3) Herringbone or diagonal opening, and the section cut forms a symmetrical double oblique angle with the belt centerline, as shown in Figure 2 (c)
3. These three types of joint ladder have their own characteristics from the use and operation of the tape:
(l) General rectangular ladder type: the stress is concentrated. When the belt runs for a long time, the whole joint is easy to crack through the cleaner and unloader. In addition, the contact area is small. Although the construction is simple and saves tape and adhesive, the bonding force is small.
(2) Herringbone ladder type: like the right angle type, the stress is relatively concentrated, and its joint is prone to overall cracking. In addition, the shape is complex and it is difficult to fit accurately.
(3) Inclined ladder type: it has good stress condition, large contact area and large bonding force, and is not easy to crack the joint. Therefore, the inclined ladder type is popularized and widely used at present.
(4) Selection of joint length: joint length or bonding length determines the bonding area of the joint and the strength of the joint. The joint length is too short, that is, the joint area is small, and the joint strength may not be maintained. If the joint is too long, the bonding area will increase and the strength will not increase obviously, which is of little significance. On the contrary, it will cause difficulty and waste in joint processing. Experience has proved that for canvas core tape with low strength requirements, the joint length can be equal to the width of the tape. The number of ladder layers of tape joint varies with the core layer of the foot, because this will cause too much loss of joint strength.
3. Thermal bonding method; Thermal vulcanization
The hot vulcanization joint is an ideal tape joint method in modern times. If the quality of the connection method is very high, its joint life can be compared with that of the tape itself. The joint can be carried out on any type of belt core repair material. A portable pressure vulcanizer is used for connection treatment to provide the pressure and temperature required for vulcanization or fusion. Vulcanization equipment; Vulcanizer, peeler, cutter, etc. Disadvantages of thermal vulcanization; It takes a long time and costs a lot.
4. Method of tape joint:
(l) Belt mechanical connection method: The metal buckle is fixed on the two joints and threaded into the pin to connect the two heads.

Characteristic; Simple operation, high speed, detachable, but low strength. The strength of the original belt is 30% - 60%. The joint is poor in disturbance, vulnerable, rolling and other parts, with high vibration and noise.
(2) Cold bonding method; The two heads of the peeling layer shall be bonded with a specific adhesive. The bonding shall be fully rolled and left for more than two hours. The operation is the same as that of hot bonding.

Characteristic; It has a good strength, no leakage, noise and vibration, and does not need expensive equipment. However, its disadvantage is that the connection strength is low and the reliability is poor. It can only be used under the conditions of limited temperature, low safety requirements and general wear resistance. It is not suitable for steel wire rope core belt.
5. New adhesive materials, tapes, pastes and adhesives shall be used for joints. Their composition and properties must be consistent with the materials used in the manufacture of belts. The effect of using semi vulcanized rubber and gel adhesives is not good. The joints may break prematurely and cause accidents. For special tapes such as heat-resistant, cold resistant, oil resistant, acid resistant, alkali resistant and flame retardant, corresponding adhesive materials shall be used, Otherwise, the joint effect will not reach the expected effect.
6. The operation site of the joint shall be absolutely dry, clean and free from dust, and shall not be exposed to the sun. For wet places, the water vapor must be removed repeatedly, and simple tents can be set up if necessary.
6. Type and length of hot vulcanized joint
(1) Fabric core conveyor belt
A.Joint form of single-layer fabric core belt minimum step length ls200-300 joint length LV 250-350 sealing glue 50mm
B. Joint form of multi-layer fabric core belt.
(2) Steel wire rope core conveyor belt
The steel wire rope core conveyor belt must use the hot vulcanization method. The overlapping length of the joint and the geometric beginning of the joint shall be determined according to the diameter and spacing of the steel wire rope, the breaking force of the steel wire rope and the drawing force bonded with the rubber. The steel wire rope in the joint shall have a certain overlapping length, so that the bonding force between the steel wire rope core and j pull at the joint is greater than the breaking force of the steel wire rope. If the spacing of the steel wire rope can place a steel wire rope and the necessary intermediate glue (1.5-5mm), the connection of the steel wire rope core conveyor belt can be in good condition, and one-stage reverse lapping can be carried out. If the spacing of the steel wire rope is not enough to place the steel wire rope and the intermediate glue conducting tensile force, multi-stage lapping is required.
7. Bonding process of ordinary polyester strip
(1) Basic parameters of adhesive tape:EP-200, B = 1600, 5 layers of nylon canvas, 6mm of upper covering glue and 3mm of lower covering glue.
(2)Preparation before bonding:
A. Site; Clean, dry, no exposure, no dust,
B. Tools; All kinds of cutting knives, pressure rollers, pliers, handles, screwdrivers, battery abrasives, steel wire wheels. Steel wire brush, slurry brush, cleaning brush, stripping pliers, tractor (winch), tape, square, marking tools (ink bucket, chalk), thermometer, plastic bucket, basin, rubber gloves, etc.
C. Prepare the required materials:
SK353, with 6mm glue on the top, 3mm glue on the bottom, 0.7mm core glue and glue slurry, and soak the glue 24 hours in advance. Ratio of gasoline to rubber; 5: 1
(3) Operation procedure:
A.Hoist the counterweight trolley or counterweight to the highest place of counterweight with chain fall;
B.Set up a working platform to facilitate work, cut off the old belt interface and prepare for tapping.
8.Adhesive tape bonding sequence:
(1) Scribing: place the adhesive tape flat on the working platform, wipe the joint part clean, and draw the center line of the joint,
(2) Draw the center line at one end of the tape and cut the section according to the 20 ° angle: the angle is the upper right corner.
The cutting line: edge glue cutting line, core glue cutting line and step pitch line.
(3) Cut off the belt according to the length of the belt
(4) Cut and peel according to the dimension line, cut and peel obliquely, and pay attention that the cutting knife cannot cut the lower canvas. After the scribing is completed, carry out sectioning and stripping. The stripping sequence is: the first layer, then the second layer, in turn, that is, start from the rear and push towards the end. During sectioning, be careful not to damage the next layer of adhesive tape. Generally, it is cut twice, the first time is cut and printed, and the second time is cut. It is commonly known as "two knife method". During the second sectioning, be careful and use force. When using butt joint, the number of steps cut out should be one less than that of the tape core layer. When using lap joint, the number of steps cut out should be equal to that of the tape core layer.
(5) Take the cut at the cut-off as the benchmark and make machining marks on the inner and outer sides According to the step type wire drawing layer, the width of the buried part is 50mm, that is, the sealing glue. The seam opening is a 45 ° cut, and the covering glue of the seam part is stripped with a needle. Only the covering glue has no canvas.
(6) Turn the end of the belt upside down and peel off the covering glue 50mm away from the end. The notch is 45 °, and the edge glue on both sides of the end should also be cut off. (6) When returning the belt, cut the first layer of core with a knife according to the step line, lift the core with 45 ° on the side of the layer lifter (screwdriver), and pay attention not to damage the next layer of core when using the layer lifter (screwdriver).
(7) Use peach pliers to pull out the canvas for about 50mm, and use a peeling machine to pull out the first layer of the belt
(8) the second step shall be stripped according to the above points. Note that only one layer of core body shall be stripped

(9) the above essentials shall be repeated until all steps are processed,
(10) Cut off the residual rubber on both sides. The rubber surface should be flat with the core surface of each step. It is easier to cut by placing something on the side.
(11) The processing department at the other end shall process according to the same essentials, and do not make mistakes in the processing of each step.
(12) First, install the lower frame and lower heating plate of the vulcanizer, and place them in order to better match.
(13) Joint ladder fit: swing the machined surfaces at both ends together to see whether each ladder and angle match. The two ends shall be overlapped to check whether the joint layers are accurately matched with each other. A gap of 5-15mm shall be reserved between the same cloth layer, but the core shall not be overlapped. If not, correct it.
(14) Joint arrangement:
After the joint is processed, it shall be sorted, pre closed and dried. Finishing is to check whether the joint processing quality meets the technical requirements, otherwise it shall be trimmed. Pre closing is to check whether there will be joint staggering, overlapping or excessive gap when the two joints are closed. The so-called staggered joint refers to the phenomenon that two joints and corresponding steps are staggered. Overlapping means that the ladder layer of one end joint is overlapped on the corresponding ladder layer of the other end joint. Generally, the butt joint clearance of the corresponding layer of the joints at both ends shall be controlled at about 1.5mm, otherwise the butt joint clearance is too large. The top closing of the end joint is carried out after the lower hot plate of the vulcanizer is arranged. If it is found that the position of the vulcanizer is inappropriate during pre closing, it shall be adjusted in time. The purpose of end joint drying is to remove the water contained in the core layer to ensure good compaction effect after gluing. The drying method is generally natural drying. If the construction site is wet, it can be heated and dried by hot blower and vulcanization electromechanical hot plate. The drying degree requires that the moisture content of the core layer shall not be greater than 5-8%.
(15) In order to accurately and reliably determine the center line of the joint belt, the four point method should be adopted. This method is introduced as follows: draw the opening line at the joint belt according to the size of the opening line, and then determine the four sizes of L1, L2, L3 and I4 L1 is generally 30 mm left stone. When determining L2, ensure that x2 point is within the opening line, L3 and L4 are generally 0 of L500 ~ - 2000 mm. Determine these four dimensions to ensure that X1 and X2 points I are within the opening line, and X3 and X4 points I are outside the opening line According to these four dimensions, find out the center points x 1, X2, X3 and X4 of each white belt respectively, ensure that these four points are in a straight line and coincide with the center line of the belt towel, and draw a small triangle on each point as shown in Figure 3 (pay attention to draw it shallowly so that it can be seen clearly). When making the joint, XL and X2 points of the belt on both sides are stripped respectively, while X3 and X4 points are reserved for less than meters, When determining the center line of the joint tape, in addition to ensuring that the four points X3 and X4 of the tape on both sides are in a straight line, the size of the diagonal of the joint shall also be checked The dimensions of the two diagonals shall be equal, and the error shall be controlled within 0.5%
(16) The center line of the belt shall be accurately marked ≥ 6m.
(17) Polish and remove the residual glue on the step surface of canvas belt joint with an electric steel wire brush. Note: avoid polishing, polishing or burning. Generally, file with a wood file or steel wire brush until there is no adhesive on the surface of the adhesive layer. 13 grind the steps with a grinding wheel and cover the adhesive cutting part; If there is a rubber cutting part left on the surface of the core, if there is a rubber residue left on the surface of the core, it shall also be polished. The part covering the cut part of the rubber shall also be polished, but the core shall not be damaged.
(18) Clean, clean with SA3500, clean the bonding surface at the joint, and scrape off the impurities adhered to the surface of the adhesive tape layer with a scraper. The purpose of cleaning is to thoroughly clean the rubber scraps and other sundries filed off on the surface of the adhesive tape layer, which can be cleaned with solvent gasoline and soft steel wire brush. When the rubber scraps and sundries can not be seen, then apply solvent gasoline on the surface of the adhesive tape to further volatilize the rubber scraps and sundries.
(19) When applying glue, the glue slurry shall be painted on the surface of the adhesive tape, which are glue scraping and glue brushing respectively. Generally scrape the glue once. Apply the thin glue on the adhesive tape by pressure method, with a thickness of about 3mm. Make the glue infiltrate into each gap of the cloth layer. Then brush the glue twice. The thickness of the first brush is about 0.1mm, and the thickness of the second brush is about 0.2mm. In addition, after scraping or brushing the glue, it must be cool and dry before brushing the glue for the second time. The purpose is to volatilize all the solvents in the glue, so that there is no blistering and firm bonding after bonding. It can be dried naturally. It can be dried by hot blowing or on the electric heating plate of the vulcanizer. However, the heating temperature must be controlled below 50 ℃. The degree of dryness can be gently glued and brushed with fingers, and it is qualified if it is not glued. When applying glue, be careful not to infiltrate sundries, etc. Then apply glue to the other side.
(20) After the slurry cleaning agent is oxygenated, it is completely dry. Lay 0.7mm core glue on the plane of the dial, and cut the core glue with a knife so that the air can be better removed. You can row more, but not too close.
(21) The width of the tape joint along the edge of the edge end is about 10mm, which is the edge glue layer made of core glue and covering glue. The quality of edge bonding also directly affects the service life of the joint.
(22) Lay newspaper or white cloth on the lower heating plate. Place the glued joint on the lower bonding plate, draw a line to align the centers of the two joints, after alignment, overlap the two ends, check whether the joint layers are accurately matched with each other, and leave 5-15mm between the same cloth layers. A 30-50mm gap is left at the lap joint, and then a 1mm thick slope adhesive strip is pasted on the 45 ° inclined surface of the upper and lower cover of the joint with core adhesive for filling, and a 30-50mm wide surface adhesive is clamped along the side skin. Fit the belt from the middle to both sides and roll it fully to prevent bubbles from accumulating.
(23) Adhesive tape bonding:
After the gluing work is completed, the clean plastic shall be paved on the plane, and the other side shall be overlapped, and the joint shall be closed and glued Make. First, align the center lines of the two joints with the steps. After confirming that there is no error, gradually withdraw the plastic cloth from the back, and then bond. Then tap with a wooden hammer from the center of the tape to both sides to dry the air between the bonding. Fully roll to prevent accumulation of bubbles. Cut the last vulcanized covering rubber to make a sealing strip, apply glue at the interface between the strip and the tape, and roll it firmly.
(24) Measure the thickness of the covering glue at the joint, stick the covering glue with the specified thickness, and cut off the excess glue with a knife. The knife edge shall be as horizontal as possible to make the incision flat. After the covering glue is pasted, it shall be fully vented.
(26) Place edge iron on both sides of the joint and fasten it with the adhesive tape. Cover the cover with newspaper or white cloth, and then put on the heating plate, heat insulation plate and upper frame. After that, align it with the lower frame, and then fasten it. For the effectiveness of counterpart, the center line shall be connected with the control box and the pressure pump, and the power supply shall be connected for vulcanization. Add 0.5mm thin iron sheet at the joint of heating plate of two vulcanizers.
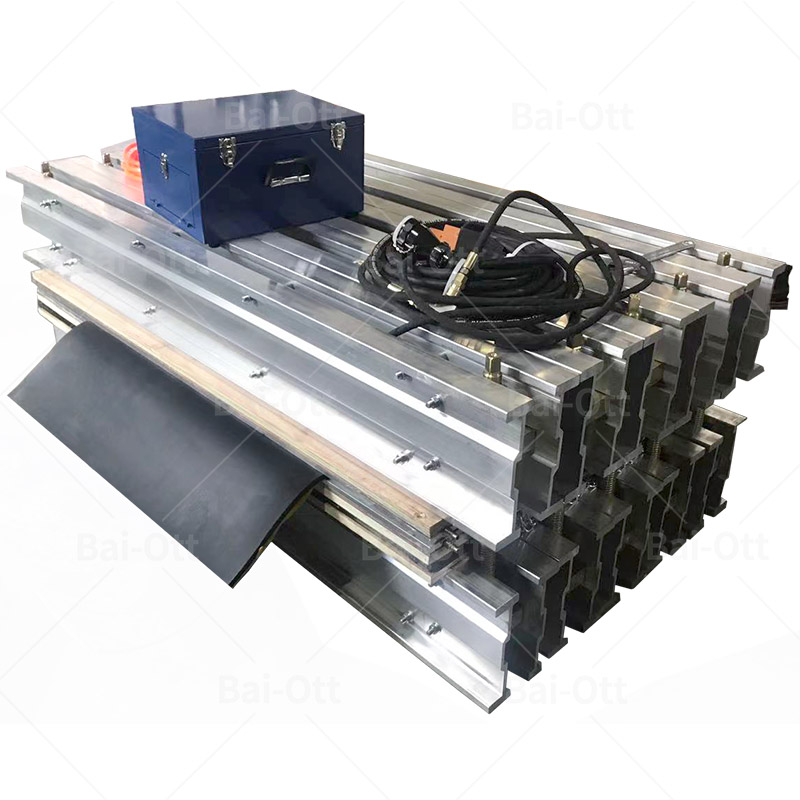
(27) Pad both sides of the tape joint with a side sizing block with a width of 40-50mm, a thickness of 0.5-1mm lower than the thickness of the tape body, and a length of 300mm longer than the length of the joint, and fix and clamp the tape joint with a splint. (place the bottom of the lower frame, the water pressure plate pressurizing device and the lower heating plate of the vulcanizer in turn before the two head scarves are connected, lay the bottom at the belt joint, then cover the upper electric heating plate, heat insulation plate and upper frame of the vulcanizer, align and align with the lower frame, and then fasten all the fastening bolts of the vulcanizer with uniform and consistent fastening force. Apply glue on the bonding surface in advance, dry it and put it on the heating plate of the vulcanizer After that, a 1mm thick slope adhesive strip shall be pasted on the 15 ° inclined plane of the upper and lower covers of the joint. Connect with the control box, connect with the electric pressure pump, turn on the power supply and vulcanize.
(28) Vulcanization process: heat up and pressurize at the same time. When the temperature rises to about 100 ° C, the pressure should reach 10kg / cm2. When the temperature reaches 145 ° C, the pressure should reach 16KG / cm2. Stop pressurization and continue heating. When the temperature reaches 145 ° C, calculate the vulcanization time and stop heating. After holding for 45 minutes, the vulcanization ends. Remove the power supply and controller, let the vulcanizer cool naturally, cool down to about 70 ° C-90 ° C, and remove the vulcanizer
(29) Belt trimming: after removing the vulcanizer, trim the rubber overflow and burr at the belt joint smoothly. So far, the whole vulcanization work is completed.
9.Precautions for conveyor belt joint:
(1). When laying, pay attention to the working surface, non working surface and winding direction of the conveyor belt. Do not make mistakes. Adjust the conveyor belt to make its center consistent with the center of the wheel frame.
(2). When cutting, the knife should be used correctly. Do not cut the sail, otherwise the strength of the adhesive tape will be reduced. Therefore, during cutting, generally leave a 0.5mm residual layer between the adhesive layer and the sail layer and a 0.3mm residual layer between the canvas layers.
(3). Prevent poor grinding or damage to the sail due to joint.
(4). The adhesive surface shall be kept clean from beginning to end to prevent oil, water or dust from sticking.
Read More: Curved Conveyor Sheet